2."Text Editing"を選択
2015年10月31日土曜日
[Mac] Xcodeのタブ設定
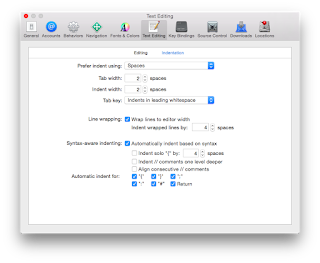
Xcodeのタブ設定は,デフォルトでは"4"となっています.以下は,"2"に変更した際のメモです.
1.「preferences」を選択
2."Text Editing"を選択
3・「Indentation」を選択し、「Tab width」と「Indent width」を変更
2."Text Editing"を選択
ラベル:
Mac
2015年10月30日金曜日
[TeX] 文章内にプログラムを記載する
TeXでプログラムのソースを記載する際に,プログラムをそれっぽく記載する方法のメモです.
プログラムの内にコメントで日本語フォントを使用している際には,"listings環境"でなく"jlisting"環境を使用する必要があります(MacのTexShop環境では,listingはデフォルトでインストールされています).
まずは,パッケージの使用のために
\usepackage{listings}
と記載します(\documentclassから\begin{document}の間).
その上で,プログラムを表示したい箇所を
プログラムの内にコメントで日本語フォントを使用している際には,"listings環境"でなく"jlisting"環境を使用する必要があります(MacのTexShop環境では,listingはデフォルトでインストールされています).
まずは,パッケージの使用のために
\usepackage{listings}
と記載します(\documentclassから\begin{document}の間).
その上で,プログラムを表示したい箇所を
\begin{lstlisting}[basicstyle=\ttfamily\footnotesize]
プログラム
\end{lstlisting}
という形で囲むとTeXの文章内でプログラムが(それらしく)表示されます.以下に記載例を示します.
¥usepackage{listings}
...
¥begin{lstlisting}[basicstyle=¥ttfamily¥footnotesize]
#include <iostream>
int main()
{
std::cout << "Hello, World!¥n";
}
2015年10月29日木曜日
[Mac] デュアルキーボード
Mac OS X (Yosemite) ,Mac mini 環境下でデュアルキーボード化を行ってみました.
左側が古いもの,右側が新しいものです.
セッティングは,キーボードのUSBを本体に接続するだけです(上記のキーボードは左側が古いものなので,日焼けしていますが,同じ機種なので,ドライバーは必要ありません).
とりあえず,普通の入力は問題ないのですが,まずは慣れが必要です.
また,問題点としては,
- 左手でShiftキーを押して,右手で文字入力を行うことができない(当然,逆も同様です).
というのが,一番の問題です.
特に,ショートカットの操作は.両手を使って行うことが多いので,とまどってしまいます.
キーボードの前に縮こまるような体勢にはなりにくいので,姿勢が良くなるので,メリットはありそうです.
ラベル:
Mac
2015年10月28日水曜日
[Mac] PRAMクリアとSMCリセット
何らかの理由でMacの画面が真っ暗になってしまい,何もできなくなってしまうということが稀に発生します.
そのような際には,PRAMクリアを行います(PRAMクリアは,Macのハードウェアに関する情報をリセットする作業).その手順は以下のようになります.
そのような際には,PRAMクリアを行います(PRAMクリアは,Macのハードウェアに関する情報をリセットする作業).その手順は以下のようになります.
- 一旦シャットダウンする.
- "command + option + P + R"を押しながら電源ボタンを押す.
大体は,この作業を行うことによって画面が表示されるはずです.
Macのファンが回りっぱなしになったり,充電ができないといった状態になった場合は,SMCリセットを行います.SMCリセットの手順は以下のようになります.
- Finder以外の起動しているアプリケーションを全部終了させる.
- シャットダウンする.
- ラップトップの場合はMacを電源に繋ぐ
- "shift + control + option"を押しながら電源ボタンを押す.
大体は,この作業を行うことによってファンが止まったり,充電が可能となるはずです.
2015年10月24日土曜日
[Mac] Mac OS X Yosemite にSciLabをインストール
以前に,Octaveのインストールに失敗したので, 代替えにというわけではありませんが,Mac OS X Yosemite にScilabをインストールした際のメモです.
なお,Scilabは,1990年からフランスのINRIAとENPCで開発されているオープンソースの数値計算システムです.2003年5月にScilabコンソーシアムが組織されて以降は,INRIAによって開発が行われています.
まずは,"Java6"をインストールします.
なお,Scilabは,1990年からフランスのINRIAとENPCで開発されているオープンソースの数値計算システムです.2003年5月にScilabコンソーシアムが組織されて以降は,INRIAによって開発が行われています.
まずは,"Java6"をインストールします.
ラベル:
Mac
2015年10月22日木曜日
2015年10月18日日曜日
中山間地での撮影動画
中山間地で,Phantom2v+を用いて撮影した動画です.
This video was taken using Phantom2v + in the hilly and mountainous areas.
This video was taken using Phantom2v + in the hilly and mountainous areas.
2015年10月17日土曜日
[Atom] 空白などの可視化設定
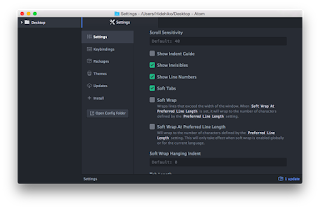
テキストエディタ Atom における,不可視文字の可視化をする際には,
Preference > Setteings > Editor Settings > Show Invisibles をON
とします.
また,全角空白を可視化するには,
Preference > Settings > Install > Show-ideographic-space をインストール
とします.
Preference > Setteings > Editor Settings > Show Invisibles をON
とします.
また,全角空白を可視化するには,
Preference > Settings > Install > Show-ideographic-space をインストール
とします.
2015年10月16日金曜日
[Atom] パッケージインストールメモ
テキストエディタとして"Atom"を使ってみることにしました.
以下は,インストールしたCommunity Packagesです.
autocomplete-paths予測変換が合わなかったので Disable 中- docblockr
- file-type-icons
- highlight-selected
- japanese-wrap
- language-fortran
- minimap
- show-ideographic-space
term2ターミナルは別に立ち上げておけば良いので Disable 中
正直なところ,テキストエディタに拘りがあるわけではないので,とりあえずといった感じです.
2015年10月8日木曜日
[Mac] OS X Yosemite のことえりユーザー辞書のインポート・エクスポート
Mac OS X Yosemite において,ことえりのユーザー辞書をインポート,エクスポートする方法のメモです.
エクスポートする方法
まずは,
インポートする方法
先述した方法で作成した,"Text Substitutions.plist(ユーザー辞書.plist)"ファイルを,
ちなみに,"Text Substitutions.plist(ユーザー辞書.plist)"をエディタで開くと,以下のように,xmlファイルでした.
<?xml version="1.0" encoding="UTF-8"?>
<!DOCTYPE plist PUBLIC "-//Apple//DTD PLIST 1.0//EN" "http://www.apple.com/DTDs/PropertyList-1.0.dtd">
<plist version="1.0">
<array>
<dict>
<key>phrase</key>
<string>移流項</string>
<key>shortcut</key>
<string>いりゅうこう</string>
</dict>
</array>
</plist>
エクスポートする方法
まずは,
System Preference(システム環境設定)> Keyboard(キーボード)
を選択し,Text(ユーザー辞書)タブをクリックします.
全ての単語を選択する場合は,⌘+A,特定の単語を選択する場合は,shiftキーを押しながら単語を選択します.
選択した状態で,ウィンドウの外にドラッグ&ドロップします.
すると,"Text Substitutions.plist(ユーザー辞書.plist)"というファイルが作成されます.
これが,エクスポート用のファイルです.
インポートする方法
先述した方法で作成した,"Text Substitutions.plist(ユーザー辞書.plist)"ファイルを,
System Preference(システム環境設定)> Keyboard(キーボード)
の,Text(ユーザー辞書)タブを開いて,辞書部分にドラッグ&ドロップします.
この方法でインポートすると,重複した単語はインポートされません.ちなみに,"Text Substitutions.plist(ユーザー辞書.plist)"をエディタで開くと,以下のように,xmlファイルでした.
<?xml version="1.0" encoding="UTF-8"?>
<!DOCTYPE plist PUBLIC "-//Apple//DTD PLIST 1.0//EN" "http://www.apple.com/DTDs/PropertyList-1.0.dtd">
<plist version="1.0">
<array>
<dict>
<key>phrase</key>
<string>移流項</string>
<key>shortcut</key>
<string>いりゅうこう</string>
</dict>
</array>
</plist>
ラベル:
Mac
2015年10月6日火曜日
[Mac] OS X Yosemite にMacPortsを用いてOctaveをインストール
Mac OS X Yosemite にOctaveをインストールした(正確には,インストールできなかった)際のメモです(XCode, Command Line Tolls, gcc,gfortranがインストールされている前提です.MacPortsを用いたgccのインストールはこちら).
ターミナルから以下のように入力すると,パスワード入力を求められるので,入力するとインストールが始まります.
ターミナルから以下のように入力すると,パスワード入力を求められるので,入力するとインストールが始まります.
$ sudo port install octave +atlas
Password:
ズラズラと以下のようにインストールが始まり,"---> Building atlas"と表示された時点で,コメントが流れるのが止まります(ちなみに,Mac Book Airでは,ファンが回りつづけました).カーソルは点滅を続けます.
---> Computing dependencies for octave
(この間に,様々なコメントが流れます)
---> Building atlas
そして,長い時間をかけて,ビルドが続くのですが,エラーが出てしまいました(ちなみに,エラーが出るまでに6時間くらいかかります).
エラーは,以下のようなものです.
エラーは,以下のようなものです.
---> Staging octave into destroot
Error: org.macports.destroot for port octave returned: command execution failed
Please see the log file for port octave for details:
/opt/local/var/macports/logs/_opt_local_var_macports_sources_rsync.macports.org_release_tarballs_ports_math_octave/octave/main.log
To report a bug, follow the instructions in the guide:
http://guide.macports.org/#project.tickets
Error: Processing of port octave failed
$ octave
-bash: octave: command not found
当然,Octaveを起動しようとしても,起動しません.
Octave のwikiページ(Octave for MacOSX)で調べてみると,以下のような記載がありました.
MacPortsに関する記載によると,インストールできると書いてあります.
こちらのページによると,homebrewだと,インストールできるようなのですが,MacPortsと競合するらしいので,MacPortsをアンインストールすると,今までにMacPorts経由でインストールしたアプリケーション等も一緒にアンインストールされてしまう問題があり,とりあえず,放置することにしました.
Octave のwikiページ(Octave for MacOSX)で調べてみると,以下のような記載がありました.
MacPortsに関する記載によると,インストールできると書いてあります.
MacPorts[edit]
MacPorts, formerly called DarwinPorts, is a package management system that simplifies the installation of software on the Mac OS X and Darwin operating systems. It is a free/open source software project to simplify installation of other free/open source software. Similar in aim and function to Fink and the BSDs' ports collections, DarwinPorts was started in 2002 as part of the OpenDarwin project, with the involvement of a number of Apple Inc. employees including Landon Fuller, Kevin Van Vechten, and Jordan Hubbard.
Simple Installation Instructions[edit]
- Install "XCode" via the Mac App Store and the "XCode Command Line Tools" as described at MacPorts' installation instructions.
- If you had installed Mac Ports in the past already, update it first by typing sudo port selfupdate and sudo port upgrade outdated in the terminal.
- MacPorts has good support for Octave. A list of what MacPorts has available for Octave is here. To install the most recent version of Octave, type sudo port install octave or if you want the experimental graphic user interface (GUI) sudo port install octave +gui at the Terminal's command line. Octave has many dependencies which will be downloaded and installed prior to Octave. The entire installation process can take a few hours.
- Note that octave-devel has been replaced by octave, see MacPorts Revision 114034.
- The variant installed may be important to the user's experience. The available variants for octave are displayed by typing port variants octave. In MacPorts 2.3.3 the variants atlas, gcc49 and glgui are installed by default (marked with '+' sign in port variants octave output). For the experimental GUI add variant +gui (see above). If you need Java support add the new Java variant (+java).
- Octave depends on arpack. Unfortunately arpack is installed with the accelerate variant by default. The accelerate variant uses Apple's Vector Libraries which have some known bugs that can cause Octave to crash if using certain functions in arpack. To avoid this install arpack with the atlas instead of the accelerate variant sudo port install arpack -accelerate+atlas. You can even do this after you installed Octave. The new variant become active by default.
- If Octave crashes when plotting use the Gnuplot graphic toolkit instead of FLTK. Type graphics_toolkit('gnuplot') in Octave before plotting. For using the nicer wxt-terminal of Gnuplot, type setenv("GNUTERM","wxt") in Octave. To make this the standard behavior append both commands in one of Octave's startup files e.g. your ~/.octaverc.
同じページ内を見ていると,Octaveを仮想マシンにインストールする方法に関しての記載もあります.
Yosemite対応のバイナリがアップデートされていないということなのでしょうか....
Yosemite対応のバイナリがアップデートされていないということなのでしょうか....
Octave server VM installer for OSX 10.10 Yosemite[edit]
Configuration files that cause Vagrant to automatically download and configure an Octave server VM under OS X including 10.10 Yosemite. The install process pulls down the latest stable Linux version of Octave at the time of installation. All software used in running this server VM is open source (Vagrant, VirtualBox, Octave). The Octave server will run headless, and display the Octave GUI and graphics on the host via the Mac's native X-windows server. The recommended configuration ensures that by default user files written by the GUI are in a folder shared with the Mac's filesystem, and the VM suspends automatically when the user quits the GUI. Any edited files then persist in the Mac's shared folder.
こちらのページによると,homebrewだと,インストールできるようなのですが,MacPortsと競合するらしいので,MacPortsをアンインストールすると,今までにMacPorts経由でインストールしたアプリケーション等も一緒にアンインストールされてしまう問題があり,とりあえず,放置することにしました.
ラベル:
Mac
2015年10月5日月曜日
[Mac] OS X Yosemite で デフォルトアプリケーションを変更する方法
Macに限りませんが,登録されている拡張子に合わせて,デフォルトでのアプリケーションが設定されます.
様々なアプリケーションをインストールしていくうちに,デフォルトのアプリケーションが変更された場合は,以下の手順で変更します.
変更したい対象となるファイルを選び,右クリックし,"Get Info(情報を見る)"を選びます.
"Info(情報)"ウインドウが開き,その中の"Open with(このアプリケーションで開く)”」という項目のタブを開きます.
開きたいアプリケーションを選びます.
"Info(情報)"ウインドウに戻り,"Change All...(すべてを変更)」を押します.
様々なアプリケーションをインストールしていくうちに,デフォルトのアプリケーションが変更された場合は,以下の手順で変更します.
変更したい対象となるファイルを選び,右クリックし,"Get Info(情報を見る)"を選びます.
"Info(情報)"ウインドウが開き,その中の"Open with(このアプリケーションで開く)”」という項目のタブを開きます.
開きたいアプリケーションを選びます.
"Info(情報)"ウインドウに戻り,"Change All...(すべてを変更)」を押します.
ラベル:
Mac
2015年10月4日日曜日
登録:
コメント
(
Atom
)


